



Customer Support Pages: What Small Firms Need
Small Business Advice
A support page should answer 3 questions at once: how I contact you, when I’ll hear back, and what happens next.
If I run a small business, that page needs to do more than list an email address. It should show support hours, reply times by channel, self-service links, booking and payment rules, refund basics, and case tracking. That cuts confusion, lowers repeat messages, and helps people fix simple issues on their own.
Here’s the full checklist in plain terms:
State what support covers in one short line
Show business hours and time zone like Mon–Fri, 9:00 AM–5:00 PM ET
Set reply times by contact method, not one blanket promise
List what support can and can’t handle
Offer phone, email, and a short form
Put FAQs and account-help links above the form
Add booking actions like Book, Reschedule, and Cancel
Spell out payment help for failed charges, receipts, card updates, and statement names
Post refund rules with deadline, eligibility, and payout timing
Show confirmation details like case number, date, time, and next step
Let people track status and know how to escalate a slow case
A few specifics matter more than most. For example, a refund window of 30 days, a booking cutoff of 24 hours, and refund processing of 5–10 business days give people firm expectations. And using a short form with just 4–6 fields keeps support requests from turning into a chore.
If I had to boil the whole article down to one point, it’s this: a good support page removes guesswork before and after contact.
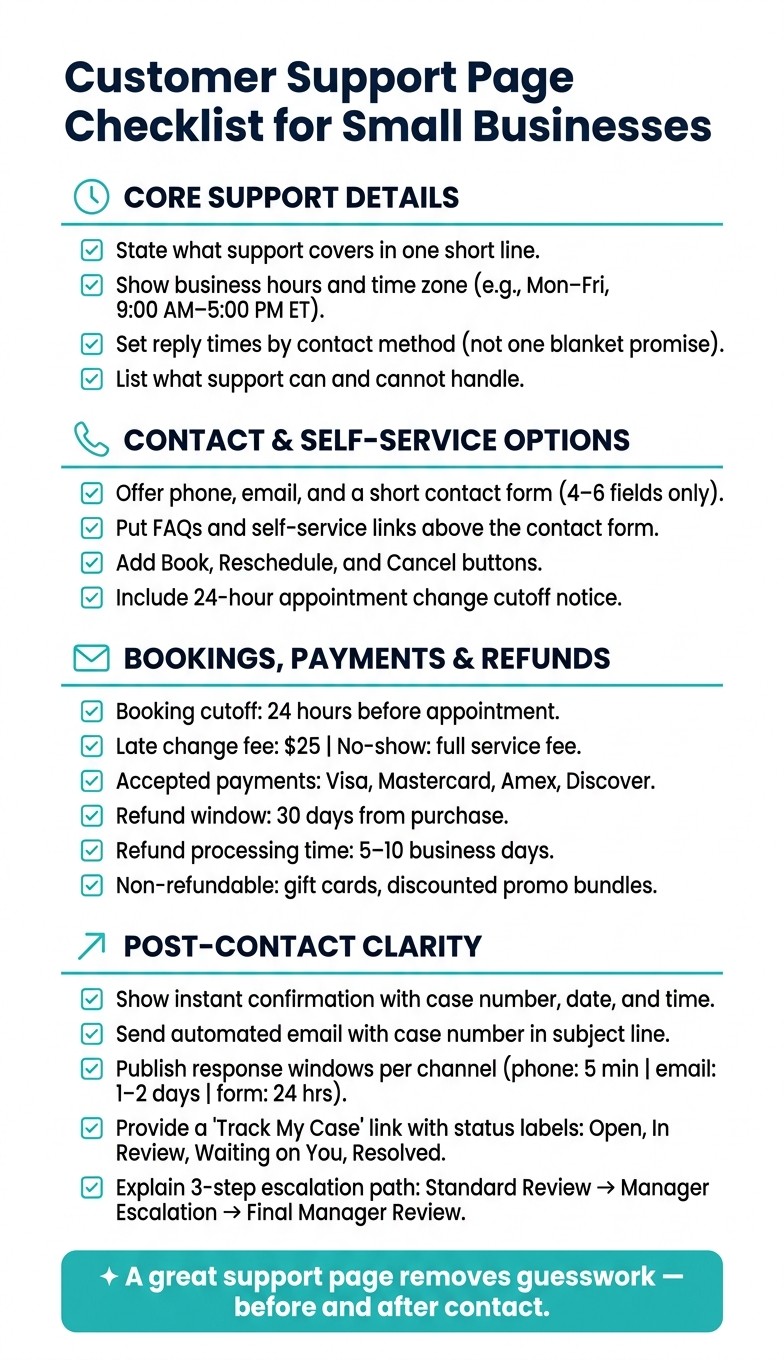
Customer Support Page Checklist for Small Businesses
Checklist: Add the Core Support Details First
Give visitors the main support details before they need to reach out. Right after your opener, add the basics they need to see at a glance. Then show each contact option and what kind of help they can expect from it.
Show Support Hours and Time Zones Clearly
Write support hours in a format U.S. readers know right away, like Mon–Fri, 9:00 AM–5:00 PM ET. Always include the time zone. If you're closed on weekends or holidays, say that plainly.
The U.S. Small Business Administration's contact page is a good model. It shows weekday hours, names the time zone (ET), and includes a clear holiday-closure note in one compact block.
List Response Times by Contact Method
Don't put every contact option under one blanket promise. Each method should have its own expected reply time. A simple table makes this easy to scan:
Contact Method | When It's Available | Expected Reply |
|---|---|---|
Phone | Mon–Fri, 9:00 AM–4:00 PM ET | Answered during business hours; voicemails returned within 2 business hours |
Send anytime | Within 1 business day (Mon–Fri) | |
Contact Form | Send anytime | Confirmation immediately; personal reply within 24 hours (Mon–Fri) |
Live Chat | When staffed | Under 1 minute during staffed hours |
Set targets your team can actually meet, and keep them steady. If your team is small, it's smarter to promise within 1–2 business days and hit that mark than to promise same-day replies and miss it. Also, define "1 business day" in plain English so there's no guesswork.
Once timing is clear, show exactly what support does and doesn't handle.
Clarify What Support Can Help With
Spell out the issue types your team handles. That helps customers choose the right path and cuts down on messages that land in the wrong place. A short list in plain language works well:
Support can help with:
Booking changes, rescheduling, and cancellations
Payment questions, failed charges, and receipts
Refund requests within the policy window
Login issues and account access
Support cannot help with:
Issues that require an in-person review
Match each support topic to the fastest next step. Link booking issues to Gatsboy's Online Bookings and payment questions to Stripe Payments, for example, so customers can take action right away instead of waiting for a reply.
Checklist: Offer Clear Contact and Self-Service Options
Once your hours and reply times are set, give visitors one quick way to reach you - or fix the problem on their own.
Include Phone, Email, and a Short Contact Form
Use phone, email, and a short contact form. Format your phone number in U.S. style - (415) 555-1234 - and clearly label any toll-free number. Use a dedicated support email like support@yourbusiness.com so customer messages don’t get lost in your main inbox.
Keep the form short and easy to finish. In most cases, four to six fields are enough:
Name
Email
Issue Type - a drop-down with options like Billing, Booking, Product Question, or Technical Issue
Order or Booking ID
Describe your issue
Make Email and Issue Type required. Leave extra fields optional so people can submit the form fast while still giving your team enough detail to sort and answer the request.
Add Links to FAQs, Help Articles, and Account Help
Put self-service links above the contact form, not below it. That small choice can save people time right away.
Group links by task, not by department, because that’s how customers think. For example, they’re looking to:
Reschedule or cancel an appointment
Track an order
Update a payment method
Download a receipt
Use plain action wording for each link. Reschedule an appointment is much clearer than Booking management portal.
Make Booking and Feedback Tools Easy to Find
Add a dedicated Manage Your Appointment area with clear Book, Reschedule, and Cancel buttons. That gives customers a direct way to handle scheduling without waiting on a reply. Include a short note that changes must be made at least 24 hours before the appointment, so expectations are clear before anyone clicks.
Use Gatsboy's Online Bookings and feedback modules to send appointment changes to the dashboard and collect ratings below the contact options. Then place a short feedback prompt under those contact options to collect ratings and comments for Google Reviews.
Next, spell out booking, payment, and refund rules so customers know which changes need approval.
Checklist: Cover Bookings, Payments, Reviews, and Refund Notes
Once your contact options are set, add the policy details people usually look for before they send a message. Bookings, payments, reviews, and refunds tend to cause the most confusion. Putting them in one support section saves people from bouncing between pages.
Add Booking Links and Appointment Change Rules
Right below the buttons, add a short policy block that covers cutoff times, late fees, and no-shows. Keep the wording simple. Let customers know they can reschedule or cancel up to 24 hours before their appointment at no charge, then spell out what happens after that point. If your customers are spread across time zones, tie the deadline to one clear zone, like 5:00 PM ET.
Situation | Rule |
|---|---|
Change or cancel before cutoff | No fee - self-service online |
Change or cancel within 24 hours | $25 late-change fee applies |
No-show | Full service fee applies |
After that, move straight into payment help. That’s where a lot of follow-up questions show up after booking changes.
Explain Payment Help in Plain Language
Focus on the four payment issues customers ask about most:
Failed payments
Unrecognized charges
Card updates
Receipts
For failed payments, tell customers to check their card number, expiration date, and billing ZIP code, then try again. If the payment still doesn’t go through, ask them to contact support and include the last four digits of their card and the amount, such as $49.00.
For unrecognized charges, show customers exactly how your business name appears on their statement. Then ask them to include the charge date in MM/DD/YYYY format and the amount when they reach out.
Make the self-service paths easy to spot. For card updates, send them to Manage Billing. For receipts, explain that receipts are emailed automatically after each payment and can also be downloaded from Payment History.
Also list your accepted payment methods in plain view, such as Visa, Mastercard, American Express, and Discover. If you use Gatsboy's Stripe Payments integration, mention that online payments are processed securely through Stripe and that refunds usually appear within 5–10 business days, depending on the customer’s bank.
Then wrap up the section with the basics on reviews and refunds so customers know how feedback and money-back requests are handled.
Summarize Reviews and Refund Policy Basics
Add a small review snapshot with your average rating and number of reviews, plus a clear link to read reviews on Google. If you use Gatsboy's Reviews Management and Google Reviews integration, recent ratings can appear in a small panel automatically.
For refunds, keep the summary short and easy to scan. Make three things obvious: who qualifies, the deadline, and how to ask for one.
Refund Detail | Policy |
|---|---|
Eligible purchases | Unused service packages, first-time subscription charges |
Request deadline | Within 30 days of purchase date |
Non-refundable items | Gift cards, discounted promo bundles |
Processing time | 5–10 business days to original payment method |
Ask customers to include their order number, purchase date, and amount when they request a refund. Then link this summary to your full refund policy so they can check eligibility, deadlines, and processing time without digging around.
Checklist: Tell Customers What Happens Next
Once someone knows how to contact you, the next job is simple: show what happens after they reach out.
This is where many support pages fall apart. A person sends a request, then sits there wondering, Did it go through? Who’s handling it? When will I hear back? That uncertainty creates extra emails, extra calls, and a lot of friction.
The fix is plain. After booking, payment, refund, and review details are in place, spell out exactly what happens after contact. That single promise - no guesswork after contact - connects confirmations, status updates, and escalation into one clear post-contact path.
Show Confirmation Messages and Case Details
Show an immediate confirmation after someone submits a form, booking, or email. Include the case number, submission time, and next step. For example, Case #8472, submitted 07/13/2026 at 3:15 PM CT. Add a short issue summary too, so the customer can tell at a glance that the request was logged correctly.
Then send an automated email with the case number in the subject line. That small detail matters. It makes the message easy to find later, especially when the customer needs to reply or check status.
For bookings, the confirmation should show:
The appointment date and time, with the time zone, such as 07/22/2026 at 2:30 PM PT
Any prep notes
The cancellation cutoff
If you use Gatsboy's Online Bookings module, booking confirmations and case references can also appear directly in the customer dashboard. That keeps everything in one place and cuts down on extra back-and-forth.
From there, make the next update and review step easy to follow.
Outline Follow-Up, Status Updates, and Escalation
Publish your actual response windows. A simple table works well here, and it should focus on post-submission review times, not first-contact timing.
Contact Method | Expected Response |
|---|---|
Phone | Within 5 minutes during business hours |
Within 1–2 business days | |
Contact form | Within 24 hours |
For refunds and booking changes, tell customers when their request will be reviewed. For example, Most refunds are reviewed within 3 business days and, if approved, appear on your card within 5–10 business days, depending on your bank.
Also give people a way to check status without calling. A Track my case link works well. They enter their email and case number, then see whether the request is Open, In Review, Waiting on you, or Resolved.
If something slows down, explain how it moves up the chain. Use three steps:
Standard review
Manager or specialist escalation
Final manager review
Be direct about how a customer triggers escalation. For example, tell them to reply to their confirmation email with Escalate in the subject line and include their case number.
Conclusion: Use This Support Page Checklist to Cut Confusion
A good support page does one thing above all else: it removes uncertainty.
When customers get instant confirmations with case numbers, know which reply time applies to each channel, can track a request without picking up the phone, and understand how to escalate if something stalls, they trust you more and contact you less.
Add clear business hours, more than one contact option, plain-language payment and refund notes, and a visible review snapshot, and the page stops being an afterthought. It becomes a working part of customer support.
For small businesses handling all of this with a lean team, Gatsboy's smart modules for bookings, Stripe Payments, and feedback help keep confirmations, status updates, and escalation flags consistent. That means your support page can make specific promises - and keep them.
FAQs
What should I put at the top of a support page?
At the top of your support page, add clear, high-level navigation so people can get help fast. Place your logo in the top-left corner and use a simple menu with labels like Contact or Support.
Also make your contact options easy to spot, such as direct messaging through your business portal. Keep this area clean and focused on the contact details people need most.
How do I set reply times I can actually keep?
Set reply times you can stick to by using Gatsboy’s communication dashboard to keep customer messages in one place. That alone can take a lot of pressure off and make it easier to stay consistent.
You can also use automated reminders for pending requests, so nothing slips through the cracks. Then list your reply times clearly on your support page, so customer expectations line up with what you can actually handle.
Do I need case tracking on a small business support page?
Not always. You don’t need a formal case tracking system to stay on top of customer support.
What matters more is giving people clear ways to reach you and having one central place to handle messages and questions.
An all-in-one dashboard like Gatsboy can help you keep messaging, leads, and support requests in order. That makes it easier to reply fast, stay organized, and build trust without adding a separate tracking platform.
Related Blog Posts
Join our community of 15,000+ business owners
Popular articles
Popular articles about your website and marketing your small business


