



Automated Email Timing: Small Business Guide
Small Business Marketing
If I had to boil this guide down to one rule, it’s this: send each email based on the customer’s action, wait the right amount of time, and send it in the customer’s local time.
That simple setup helps me reply fast, cut extra follow-ups, and send messages when people are more likely to open them. The article focuses on four email jobs: lead follow-up, booking messages, review requests, and payment reminders. It also points to a few timing ranges that matter most, like 5–15 minutes for new leads, 24–48 hours for many appointment reminders, and 8:00–11:00 AM local time for many weekday business emails. One stat stands out: sending by local time instead of one fixed U.S. send time led to a 12% lift in opens in the case study cited.
Here’s the short version:
Start with one trigger per workflow
Set a delay that fits the situation
Use a send window tied to local time
Stop emails when the goal is done like a booking, payment, or review
Track results such as opens, clicks, show-up rate, review rate, and paid invoices
Change one timing variable at a time and give it 2–4 weeks before judging it
A few timing defaults from the guide:
Lead nurture: welcome email in 5–15 minutes, then follow-ups over the next week
Booking confirmation: send in 1–5 minutes
Booking reminders: usually 24 hours before and 2–3 hours before
Review requests:same day for fast-result services, or 24–72 hours later when results take longer
Payment reminders:3–7 days before the due date, then again on and after the due date if unpaid
Workflow | Best starting trigger | First timing move | Common send timing |
|---|---|---|---|
Lead follow-up | Form submission | Send welcome email fast | 5–15 minutes after signup |
Booking messages | Appointment created | Confirm right away | 1–5 minutes, then reminders before visit |
Review requests | Job complete or payment cleared | Wait based on service type | 2–4 hours or 24–72 hours |
Payment reminders | Invoice due date or upcoming due date | Start before due date | 3–7 days before, then after due date if unpaid |
What I like about this approach is that it keeps email timing simple: one action, one delay, one time window. That makes the system easier to run and easier to improve.
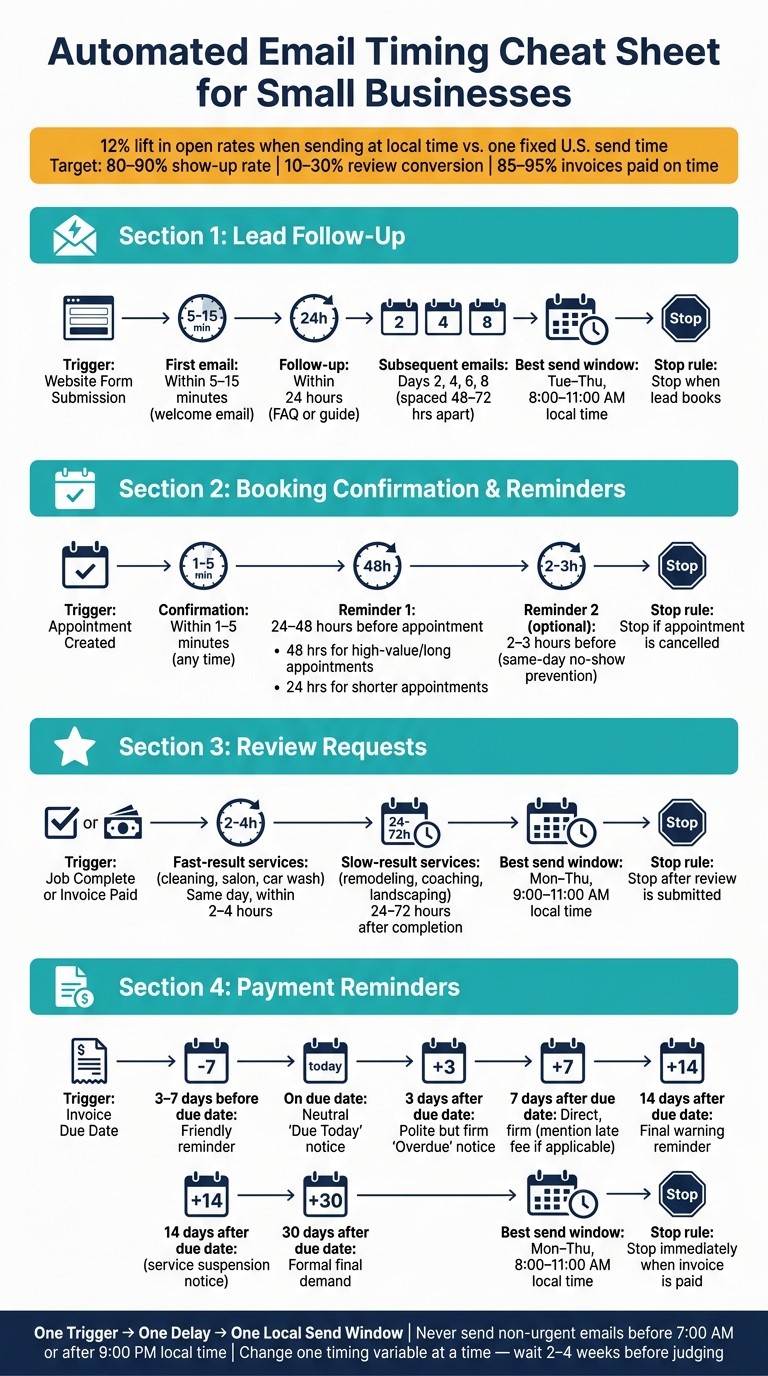
Automated Email Timing Cheat Sheet for Small Businesses
Step 1: Set Triggers and Send Delays
Choose One Trigger per Workflow
Use one trigger for one workflow. Tie each business goal to the right trigger, and the rest of the timing gets much easier to set.
Sequence | Trigger Event | Key Fields to Map |
|---|---|---|
Lead Nurture | Website Form Submission | Name, Email, Interest Tag |
Booking Confirmation | Appointment Created | Send within minutes; map Appointment Time, Service Type, Client Name |
Review Request | Service Completed / Invoice Paid | Customer Name, Service Category, Team Member |
Payment Reminder | Invoice Due Date Reached | Amount Due, Due Date, Invoice Link |
Gatsboy can route leads, bookings, reviews, and Stripe payments into one dashboard.
Once you set the trigger, lock in the first delay and the stop rule.
Set the Delay in Minutes, Hours, or Days
Match the delay to the urgency of the moment. A new lead should get a response right away, while interest is still high. A review request for a professional service like legal or medical work often works better with a 24–48 hour gap.
Sequence | Recommended First Delay |
|---|---|
New Lead / Booking Confirmation | Immediate (within minutes) |
Review Request (trade/service) | 2–4 hours after job completion |
Payment Reminder | 3 days after the due date (if unpaid) |
For lead nurture, use Days 0, 2, 4, 6, 8. For overdue invoices, use Days 3, 7, 14, 30 after the due date.
Add Stop Rules
Timing matters, but stopping matters too. If someone has already paid, payment reminders should stop. If a lead books, the nurture sequence should stop as well.
Email Automation for Beginners: 5 Mistakes to Avoid
Step 2: Match Send Times to Local Business Hours and US Time Zones
Once your triggers and delays are set, the next step is simple: make sure your emails land when people are most likely to see them.
Send by Local Time, Not One U.S. Send Time
The U.S. covers four main time zones: Eastern, Central, Mountain, and Pacific. So one fixed send time can work for one group and miss the mark for another.
A 2025 case study found that sending emails at 10:00 AM–12:00 PM in each recipient's local time improved open rates by 12% compared with sending everything at 10:00 AM ET for a business serving both East and West Coast customers.
That’s why local send time matters. If someone in California gets an email based on an East Coast schedule, it may show up far too early. On the flip side, a time that feels right in Los Angeles can land too late in New York.
Use state or ZIP code data to place contacts in the right time zone. Gatsboy can tag leads, bookings, and Stripe payments by region so emails go out based on the recipient’s local time.
Use Weekday Morning Windows for Most Business Emails
For lead nurture emails, review requests, and general updates, Tuesday through Thursday, from 8:00 AM to 11:00 AM local time, tends to be the safest bet. Omnisend's research puts Tuesday's open rate at 31.27%. Midweek usually works better because it avoids the Monday pileup and the Friday slowdown.
For routine sequences, use this default window.
Appointment emails play by a different set of rules. Booking confirmations should go out right away, no matter the hour. Reminders should match the appointment itself, usually 24 hours before and then again 2–3 hours before, while still following local time. Payment reminders tend to work best on Monday through Thursday mornings, when people are starting the business day and are more likely to act.
Use these timing defaults by workflow:
Email Type | Recommended Days | Send Window (Local Time) |
|---|---|---|
Lead nurture | Tue–Thu | 8:00–11:00 AM |
Review requests | Mon–Thu | 9:00–11:00 AM |
Booking confirmations | Any | Immediate |
Booking reminders | Any (trigger-based) | 24 hrs before, then 2–3 hrs before |
Payment reminders | Mon–Thu | 8:00–11:00 AM |
One last guardrail: don’t send non-urgent automated emails before 7:00 AM or after 9:00 PM local time.
Step 3: Set Timing for the Four Core Email Sequences
Use the trigger, delay, and send-window rules from Steps 1 and 2 to schedule each core sequence. These four sequences are driven by customer actions: signup, booking, completion, and invoice due date.
Lead Nurture and Booking Reminder Timing
For lead nurture, move fast. Send a welcome email within 5–15 minutes of signup. That email should confirm what the lead signed up for and give them one clear next step, like booking a free consultation or downloading a checklist.
Then follow up within 24 hours with something useful, such as a short FAQ, a quick guide, or a case study. After that, send 2–3 more emails over the first week, spaced 48–72 hours apart. Keep each email focused on just one topic. If you use Gatsboy's AI Content Generation and Online Bookings, you can draft those emails and link straight to live availability.
Booking reminders work a bit differently because they run backward from the appointment time.
The main goal is to cut no-shows without stuffing someone's inbox. Send an instant confirmation as soon as a booking is created, within 1–5 minutes. Include the date, like "Thursday, July 16, 2026", the time with time zone, like "3:00 PM ET", the location, and any prep steps.
Then send a reminder 24–48 hours before the appointment:
Use 48 hours for high-value or longer appointments, such as consultations or large home projects
Use 24 hours for shorter appointments, such as haircuts or routine checkups
If your business deals with a lot of day-of no-shows, add an optional same day reminder 2–3 hours before.
When to Send Review Requests After a Job Is Done
Trigger the review request when the job is complete or the payment has cleared. That way, you only ask people who have fully received the service.
For services with immediate results, like cleaning, salon visits, or car washes, send the request the same day, within a few hours of completion. For services where results take time to show up, like remodeling, coaching, or landscaping, wait 24–72 hours before sending.
Keep the email short. Thank the customer, ask for a Google Review, and include a direct link. If you use Gatsboy's Reviews Management and Stripe Payments, the system can send the request as soon as payment clears, with service details and a review link already filled in.
Once the service is done, the next step is collections follow-up.
Payment Reminder Timing Before and After the Due Date
Send the first reminder 3–7 days before the due date. That gives customers enough time to pay without making the message feel pushy. After that, use a clear escalation path. As the invoice gets older, the tone should get firmer.
Every reminder should include the same core details: the invoice number, customer name, service description, amount due like $750.00, due date, and a direct payment link. If you use Gatsboy's Stripe Payments integration, reminders can pull live invoice status and stop on their own once payment comes in.
Reminder Timing | Tone | Required Email Elements |
|---|---|---|
3–7 days before due date | Friendly, helpful | Invoice #, amount, due date, payment link |
On the due date | Neutral, clear | Invoice #, "Due Today" notice, payment link |
3 days after due date | Polite but firm | Invoice #, "Overdue" status, payment link |
7 days after due date | Direct, firm | Invoice #, late fee notice (if applicable), payment link |
14 days after due date | Firm, final warning | Invoice #, service suspension warning, payment link |
30 days after due date | Formal, final notice | Invoice #, final demand, contact info for resolution |
Step 4: Track Results and Adjust Timing Over Time
Once your triggers, delays, and send windows are live, start checking results on a steady schedule. For active workflows, review them weekly. For evergreen sequences, a monthly check is usually enough. After each workflow goes out, the timing data shows whether your emails are reaching people when they're most likely to respond.
Metrics to Watch: Opens, Clicks, Bookings, Reviews, and Payments
Each sequence has its own job. So the main metric should match that job.
Sequence | Primary Metrics to Watch | What It Shows |
|---|---|---|
Lead nurture | Open rate by send time, click-through rate, and booking conversions | Whether the email lands when people are ready to act |
Booking reminders | Open rate, clicks on confirm/cancel links, and appointment show-up rate | Whether the reminder timing reduces no-shows |
Review requests | Open rate, clicks on review links, and reviews collected | Whether the delay after job completion is right |
Payment reminders | Open rate, payment-link clicks, and percentage of invoices paid on time | Whether pre-due and overdue timing is helping collections |
Good target ranges look like this:
80–90% show-up rates
10–30% review conversion
85–95% of invoices paid by the due date
If you use Gatsboy's business dashboard with Online Bookings, Reviews Management, and Stripe Payments, you can track these results in one place.
Test One Change at a Time and Keep a Clean Send Cadence
When a workflow underperforms, don’t tear up the whole thing. That usually creates more confusion than clarity. Change one variable at a time. For example, move the send time from 2:00 PM to 9:00 AM, while keeping the subject line, content, and audience the same. Then let the test run for two to four weeks so you get a full weekly behavior pattern before making a call.
Once you find a send time that works, keep it and write it down. After that, test the next item, like whether one booking reminder does better than two.
It also helps to set stop rules. If someone confirms, pays, or leaves a review, they should leave that sequence right away. And set a frequency cap across workflows too. A simple rule like no more than two to three non-essential emails per week per contact can prevent overlap from turning into inbox overload.
Conclusion: Build Email Timing Around the Customer Action, Local Time, and Business Goal
Put those steps together, and email timing gets a lot easier. Good automated email timing comes down to three decisions: the trigger, the delay, and the send window. Build each workflow around one trigger, one delay, and one local send window.
Then match the cadence to the goal. Lead nurture needs a fast first reply and a short follow-up window. Booking reminders tend to work best with one reminder the day before and another a few hours before the appointment. Review requests need one well-timed ask and one follow-up. Payment reminders usually work best when they’re spaced across the days before and after the due date, with clear stop rules once the invoice is paid.
A dashboard that ties these actions together makes that cadence much easier to manage. If you use Gatsboy, you can connect Online Bookings, Stripe Payments, and Google Reviews to automatic triggers and stop rules, so sequences stop when a lead books, a customer pays, or a review is posted.
Use the customer action, local time, and business goal as your timing rules. That keeps your sequences focused, well-timed, and tied to real customer actions, while you improve one timing change at a time.
FAQs
How do I choose the best trigger for each email workflow?
Choose the trigger based on the customer action or stage you want the email to match.
For transactions and services, use event-based triggers like a completed payment, a finished appointment, or a completed job.
For leads, use form submissions or new contact entries in your Gatsboy dashboard.
For new subscribers, trigger a welcome sequence at signup.
For ongoing engagement, send newsletters or updates on a consistent schedule.
What should I do if I don’t know a customer’s time zone?
If you don’t know a customer’s time zone, use automated tools that handle scheduling and messages across regions.
For email reminders, tie the send time to the event itself, not to a fixed clock time. For example, send reminders one day, three days, or one week before the event. That way, the timing makes sense even when the recipient is in a different time zone.
How can I tell if my email timing is working?
Check your Gatsboy business dashboard for real-time email results, including whether messages were sent, delivered, or opened. Strong open rates and steady engagement usually mean your timing is on track.
You should also look at conversions from each sequence, such as bookings, reviews, or payments that happen after a scheduled email. If those numbers look weak, head to your dashboard’s communications section and adjust the delays.
Related Blog Posts
Join our community of 15,000+ business owners
Popular articles
Popular articles about your website and marketing your small business


