



How to Build Lead Qualifiers with No-Code Calculators
Small Business Marketing
A lead qualifier calculator should do one job: score a visitor fast and send them to the right next step.
If I were building one, I’d keep it simple:
Ask 5–7 multiple-choice questions
Score answers on a 0–100 scale
Sort leads into 3 groups: hot, warm, or cold
Show a short result before asking for contact info
Send each lead to the right path: book, review, or nurture
The article’s main point is simple: don’t start with questions. Start with the decision you want the calculator to make, then build the score rules, short question flow, routing, and testing around that. A basic setup like this can save sales time, cut back-and-forth, and help you focus on leads with better fit.
A few numbers stand out:
Use 4–6 scoring criteria
Keep each screen to 1–2 questions
Keep the contact step to 5–8 fields
Review score bands every month or quarter
Test with at least 10–20 sample leads
Here’s the article in one view:
Part | What it covers |
|---|---|
Goal | Make one clear decision from each submission |
Scoring | Turn business rules into weighted points |
Questions | Ask only what changes the score |
Handoff | Pass score, tier, and answers into the lead record |
Routing | Send hot, warm, and cold leads to different next steps |
Testing | Check logic, device behavior, and score accuracy |
In short: I’d build the logic first, keep the flow short, and let lead data shape future changes.
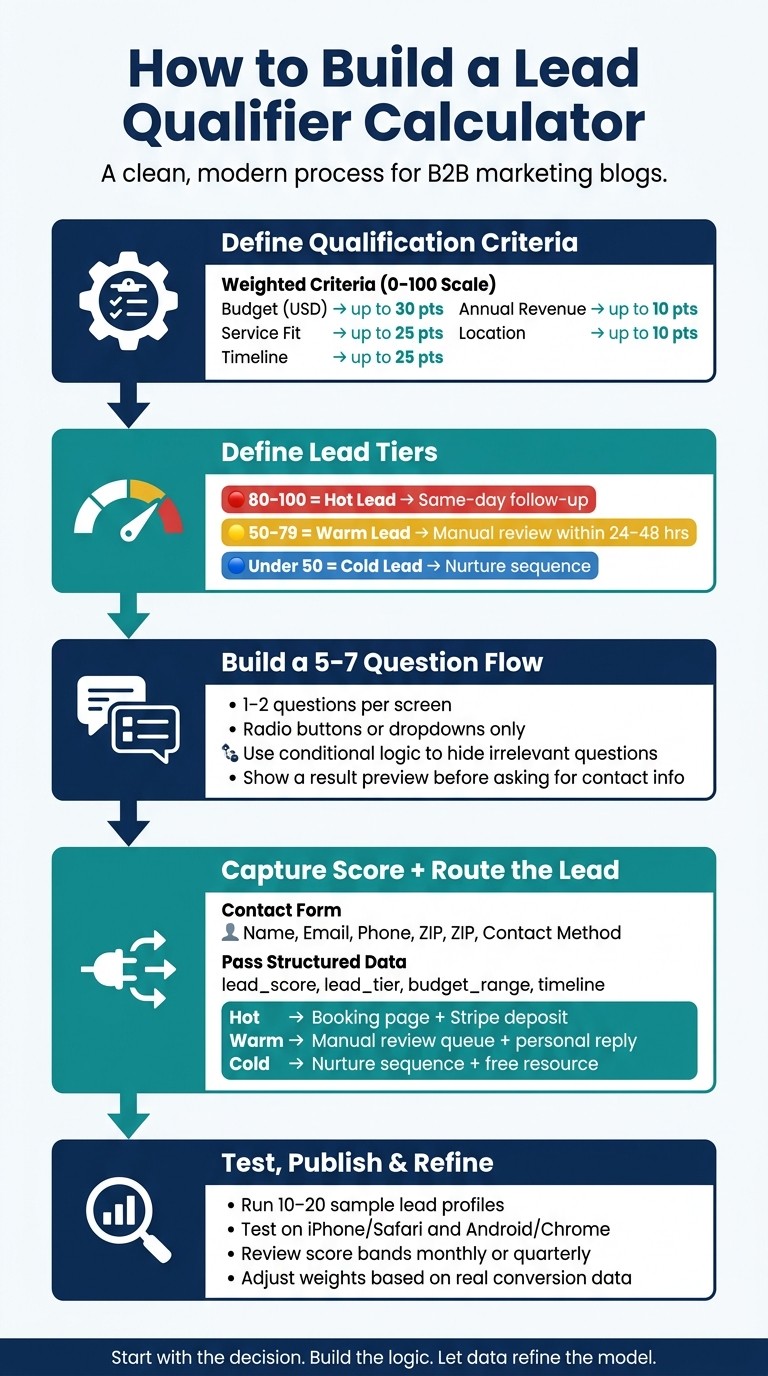
How to Build a Lead Qualifier Calculator: 5-Step Process
How to Build a Lead Generation Quiz (That Scores Leads For You)
Build the qualification logic first
Start with the outcome, then turn that into score rules. If you know the decision your calculator needs to make, the next step is simple: list the criteria that drive that decision. Set the rules first, and you'll build faster with less back-and-forth later.
Turn business criteria into weighted score rules
Look at your last 20–50 leads. Find the patterns that separate strong-fit leads from weak ones, then assign scores to those patterns.
A simple setup is to choose 4–6 criteria and give each one a maximum point value based on how much it matters to your business. On a 0–100 scale, a practical split for a U.S. service business can look like this:
Criteria | Max Points | Example: High Score | Example: Low Score |
|---|---|---|---|
Budget (USD) | 30 | Over $5,000 = 30 pts | Under $2,000 = 5 pts |
Service Fit | 25 | Full new website and ongoing support = 25 pts | Only minor updates = 10 pts |
Timeline | 25 | 1–3 months = 25 pts | More than 3 months = 15 pts |
Annual Revenue | 10 | $100k–$1M/year = 10 pts | Under $100k/year = 5 pts |
Location | 10 | Within the U.S. = 10 pts | Outside the U.S. = 5 pts |
Stick with multiple-choice answers instead of open text. That makes scoring much easier, and it also keeps submission data clean inside a lead dashboard. In plain terms, the calculator stays focused on lead qualification instead of turning into a catch-all form.
Each question should map to a score input. If a question doesn't affect the score, it probably doesn't belong here.
Set score bands for qualified, needs review, and not qualified
Once the total score is in place, decide what each range means. You need three buckets and a clear next step for each one.
On a 0–100 scale:
80–100 = hot lead. This should trigger same-day follow-up or send the person straight to a consultation booking link.
50–79 = warm lead. This goes to a manual review queue, where a team member checks the answers within 24–48 hours before deciding what happens next.
Under 50 = cold lead. This should move into a lighter nurture path, like an email sequence or a short feedback form asking what they were looking for.
Gatsboy can connect these score bands to actual workflow actions - online bookings for hot leads, lead management queues for warm ones, and feedback collection for cold ones - so the routing happens on its own instead of depending on someone to check a spreadsheet every morning.
Before you build, put these thresholds into a simple internal table. Then, when your offer changes or your minimum project size shifts, you can adjust the point values without rebuilding the whole thing.
Design a 5–7 question Flow that Keeps Intent High
Once your scoring model is ready, turn it into a short flow that collects only the inputs that change the outcome.
Start with Low-Friction Questions and Group Related Inputs
Start with the service they want. Then ask about budget, timeline, location, and how soon they want to get started. Ask about company size only when it affects fit. Add one more requirement only if it changes the score.
Keep each screen to 1–2 questions. Use radio buttons or dropdowns instead of open-text fields. And write every option in plain, everyday language.
Use Conditional Logic to Hide Irrelevant Questions
Once the core questions are set, use branching to skip anything that doesn't matter anymore.
If someone selects "On-site home services," show a ZIP code field and a homeowner/tenant question so the lead goes to the right place. If they select "Remote consultation," those local questions should stay hidden, and the next step can ask about availability for a video call instead.
The key idea is simple: hide irrelevant questions completely so the form feels short and easy to finish.
Show a Result Preview Before Asking for Contact Details
Before you ask for contact details, show visitors what their answers mean.
A short fit preview does the job:
"Strong fit: Your budget and timeline match our typical project scope."
Gatsboy can insert selected answers into the preview automatically. Once that preview appears, the contact step feels like a natural next move:
"Want a personalized proposal based on your results? Share your details and we'll follow up."
Connect the Form Handoff and Follow-Up Workflow
Capture Contact Details Along with the Score and Answer Data
After a visitor sees their result preview and decides to continue, the contact form should ask for a tight set of details: full name, email, mobile number, preferred contact method, and ZIP code for service-area routing. Keep the post-calculator form to 5–8 fields. Once forms get longer than that, mobile drop-off climbs fast.
The form shouldn't stop at basic contact info. It should also pass the score, tier, and answer data into the lead record as structured fields. Include the qualification details the visitor already shared, too: estimated budget in USD, desired start date in MM/DD/YYYY format, and urgency such as "within 2 weeks" or "within 1–3 months." That gives the person following up a clear picture of the lead's situation without making them ask the same questions all over again.
Gatsboy stores fields like lead_score, lead_tier, budget_range, and timeline in the business dashboard for easy sorting.
And that record should trigger routing on its own, not end up buried in a spreadsheet.
Route Hot, Warm, and Cold Leads to the Right Next Step
Once the form is submitted, each lead should move straight into a tier-based workflow.
Tier | Next Step |
|---|---|
Hot | Redirect to online booking; collect a deposit via Stripe |
Warm | Flag for manual review; send a tailored personal reply |
Cold | Add to a light nurture sequence; offer a free resource |
Hot leads should go straight to a booking page with no extra friction. The booking flow should show U.S. time slots, use a familiar date format, and accept a USD deposit. That's the payoff: the person qualifies themselves and books right away. Gatsboy connects advanced forms, lead collection, and online bookings inside one website workflow, so a hot lead can go from calculator result to confirmed appointment - and optional Stripe payment - without leaving the site.
Warm leads should land in a manual review queue inside the dashboard. A staff member can review the score breakdown, budget, and ZIP code, then send a personal follow-up that speaks to the lead's exact answers. Cold leads can be tagged and placed into a light nurture sequence, like a pricing guide, an FAQ, or an occasional offer, without pushing too hard.
Add Review and Feedback Prompts Where They Fit
Feedback helps you see whether the calculator's score lines up with the leads you want.
Two spots make the most sense: right after a borderline result and after a service is completed.
If a lead scores just under the "Warm" cutoff, add a short prompt asking whether the result felt accurate, along with a free-text field for comments. Over time, this can show patterns. If many borderline leads point to the same confusing question, that's a strong sign that the wording or scoring weight needs to change.
After the work is done, ask whether the calculator estimate matched the final scope, price, and timeline. Gatsboy supports reviews management and feedback workflows, so those responses connect back to the original lead record. That gives owners a direct view of how well the qualification model lines up with actual outcomes.
Publish, Test, and Improve the Calculator on Your Website
Style the Calculator to Match Your Site and Reduce Drop-Off
Make the calculator look like it belongs on your site. Use the same colors, fonts, and border radius so it feels like a natural part of the page, not a bolt-on widget.
Small wording changes help too. Instead of a flat label like "Submit", use text that tells people what happens next, such as "See my score." That feels clearer and a bit more inviting.
A few design choices can also help reduce drop-off:
Add a simple progress indicator
Use a single-column layout on mobile
Keep tap targets at least 44 px tall
If you're using Gatsboy, global style tokens can keep fonts, spacing, and button sizes consistent across modules.
Once the design is set, make sure the logic and routing still work across every device.
Test Score Accuracy, Form Routing, and Device Behavior
Run at least 10–20 sample lead profiles through the calculator. Cover the full range: typical leads, borderline cases, and people who should not qualify. Include edge cases too, like a lead with the maximum budget but almost no timeline flexibility. That’s where scoring rules tend to crack.
Then compare those results with how you already qualify leads. If the calculator gives a different answer, that usually means a weight or threshold needs work.
Check the full flow, not just the final score. Test branching, progress steps, and validation. Submit one clearly labeled dummy lead for each score band, then confirm the correct email, dashboard list, and booking or payment step fires.
Device testing matters more than people think. Test on iPhone/Safari and Android/Chrome. Also check modern desktop versions of Chrome, Safari, Edge, and Firefox. Emulators are useful, but they can miss things like keyboard behavior, auto-fill issues, and odd scrolling problems.
Conclusion: Keep the Model Simple and Refine It with Real Lead Data
Once the calculator is live, use actual lead outcomes to tune the model. Review score bands monthly or quarterly against conversion results. If leads marked as qualified rarely convert, tighten the rules. If leads in the review bucket often turn into customers, loosen them.
Put the most weight on the questions that best predict outcomes. In many cases, that’s budget, timeline, and fit. At the same time, keep the formula simple enough that a nontechnical teammate can explain it without squinting at a spreadsheet.
Use the dashboard to tie lead scores to bookings and payments, then adjust the rules based on what the numbers show. Start simple, publish fast, and let real data shape the next round of changes.
FAQs
How do I choose the best scoring criteria?
Start by looking at how your business runs and the main traits of your ideal customer. Zero in on the service details that matter most, like project complexity, budget, and urgency.
If you offer more than one type of service, give more points to responses that point to a high-value lead or a strong match for your expertise. You can set these rules in your Gatsboy dashboard so your scoring lines up with your business goals.
What should I do if too many leads fall into one tier?
Tighten your scoring logic so it draws clearer lines between prospects. Shift the weight of certain answers to sort leads more accurately by intent and buying readiness.
In the Gatsboy dashboard, use the Lead module to export and filter entries. Look at which criteria are bunching too many people together, then adjust your scoring rules so follow-up stays focused and easy to handle.
How often should I update my lead qualifier calculator?
Update your lead qualifier calculator any time your pricing, services, or lead scoring rules change.
With Gatsboy’s modular, no-code setup, you can make those updates from one central dashboard without needing technical help. That makes it easy to keep the calculator in step with your goals and the way your team handles leads.
A simple review now and then can go a long way. If your sales process shifts, your calculator should shift with it.
Related Blog Posts
Join our community of 15,000+ business owners
Popular articles
Popular articles about your website and marketing your small business


