



How Booking Systems Sync With Business Calendars
Small Business Advice
If your booking tool doesn’t read your calendar, you can get double-booked. The fix is simple: connect the right business calendar, turn on two-way sync, map each staff member to their own calendar, and test bookings, payments, and time zones before you go live.
Here’s the short version in plain English:
Your booking system controls when you can work
Your calendar shows when you’re already busy
Two-way sync checks both, so customers only see open slots
Each staff member should use their own calendar
Only paid, confirmed bookings should block time
Your time zone, service length, and buffers must match across the system
Before launch, test booking, blocking, cancellation, and rescheduling
A simple setup can stop a lot of problems. For example, if a 60-minute service has a 10-minute buffer, your calendar should block 1 hour 10 minutes, not just 1 hour. And if you charge $75.00 for that service, the slot should stay open unless payment goes through.
Here’s what I’d check before turning bookings on:
Area | What matters most |
|---|---|
Calendar sync | Use two-way sync, not one-way only |
Account setup | Connect a business-owned email |
Staff setup | Give each person their own calendar |
Availability | Set work hours, breaks, lead time, and buffers |
Payments | Block time after payment clears |
Time zone | Keep the business on one U.S. time zone and show times clearly |
Final testing | Test booking, blocking, cancellation, and rescheduling |
About 35% to 40% of appointments in many service businesses are now booked online, so setup mistakes can hit your schedule fast. I’d treat calendar sync as the part that keeps your booking page honest.
Below, I’ll walk through the setup steps and the final checks that help keep your availability accurate.
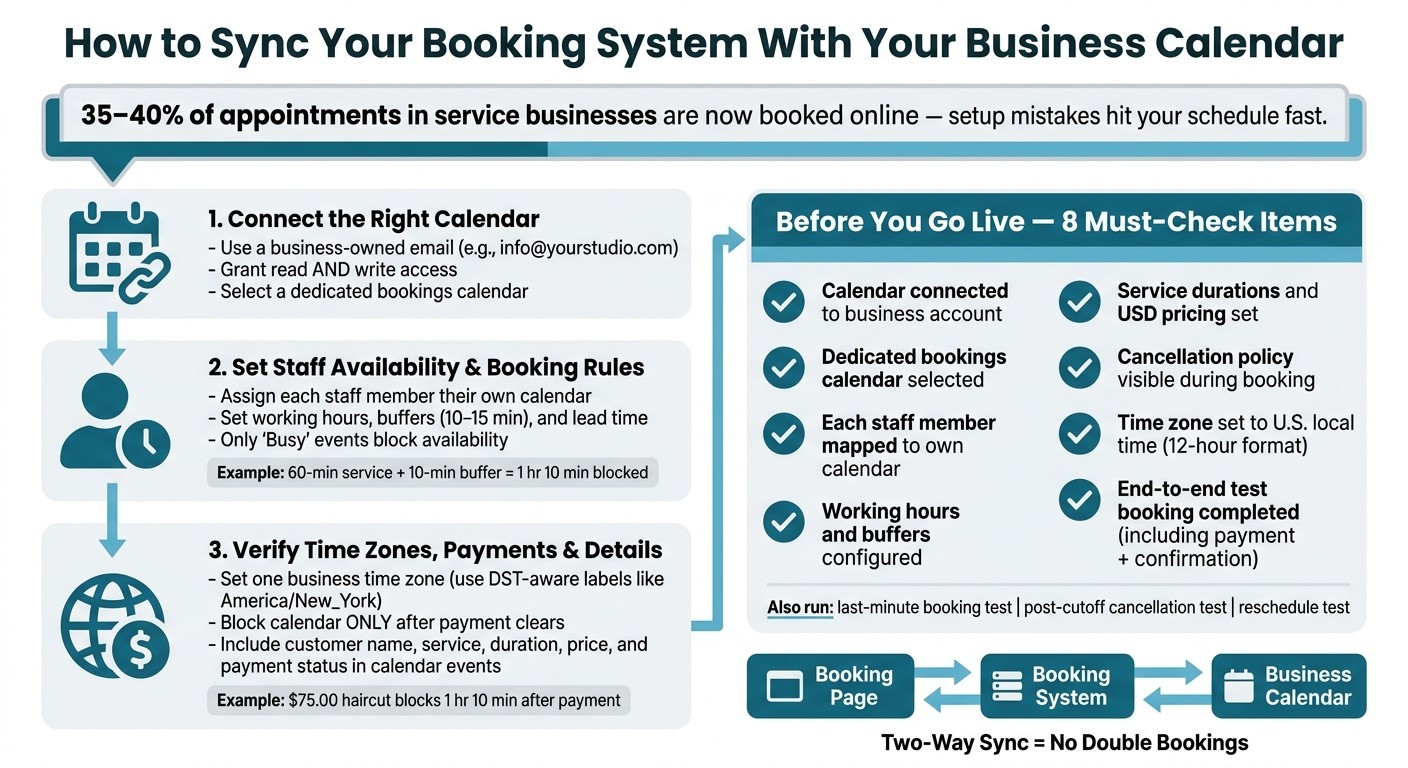
How to Sync Your Booking System With Your Business Calendar
Step 1: Connect your booking system to the right business calendar
Choose the right account and grant calendar permissions
Open Integrations, Calendar, or Connected Apps, then pick Google Calendar, Outlook, or iCloud.
The account you use here matters more than most people think. Sign in with the business-owned email - for example, info@yourstudio.com - not a personal address. If a team member connects their own account and later leaves, access can disappear and the sync can stop working. A work account keeps control with the business.
Grant both read and write access to calendar events. Read access helps stop double-booking. Write access lets the system save new appointments.
Select which calendar should receive bookings
After you connect the account, the booking tool will show all calendars linked to it. Choose one clearly named calendar for bookings, like Main Studio Calendar or Consulting Schedule.
If the new calendar doesn’t show up, click Refresh or Reload calendar list. Google and Outlook sometimes take a few minutes to show new calendars through their APIs, so this small step often fixes it.
Test whether sync is one-way or two-way
Once the calendar is connected, do two fast checks before you go live.
Test 1 - New bookings appear in the calendar: Create a test appointment through your booking page. Then make sure the event shows up in the connected calendar with the right date, time, and duration.
Test 2 - Calendar blocks hide time slots: Add a busy event straight into the connected calendar. Then check that the same time slot disappears from the booking page. After the sync updates, look again. If that slot still appears, the system isn’t reading calendar events, so go back and check the permissions you approved during setup.
Run both tests for every staff calendar before launch.
Once each calendar passes both checks, move on to staff availability, service length, and booking rules.
How to Sync Bookly with Google Calendar
Step 2: Set up staff availability, service lengths, and booking rules
A connected calendar blocks time that’s already taken. Booking rules handle the rest: working hours, service length, buffer time, and lead time. Once calendar sync stops conflicts, these rules decide which time slots customers can book.
Assign calendars to individual staff members
Open the Staff or Users area in your booking system and connect each person to their own calendar - one Google Calendar or Outlook calendar for each team member. That way, a busy event on one person’s calendar removes only that person’s availability, not the whole team.
Here’s a simple example. In a two-chair salon, if Stylist A has a 10:00 AM dentist appointment marked busy on her calendar, Stylist B should still be open for bookings at 10:00 AM. If both staff members aren’t set up with separate calendars, one person’s conflict can block the whole business by mistake.
In Gatsboy, connect each staff profile to its own calendar and booking rules so bookings and payments stay tied to the right person.
Once each staff calendar is connected, set the times when that person can accept appointments.
Set working hours, buffers, and lead time in the booking system
In the Business Hours or Availability section, enter when each staff member actually works - for example, Monday through Friday, 9:00 AM–5:00 PM. Then add recurring breaks and set buffer time to leave 10–15 minutes between appointments.
Lead time matters too. It stops customers from booking too close to the appointment time. For example, you might allow booking only if it’s at least 24 hours ahead, or block same-day bookings after a set cutoff.
Prevent double booking with conflict rules
Only events marked busy should block availability. Recurring meetings, vacation blocks, and all-day events will hide those time slots. Events marked free will not.
Be careful with shared calendars. Don’t add all-day busy events to a shared business calendar unless the entire business is closed. If a calendar change doesn’t sync, refresh the connection or reauthorize the calendar.
Next, check time zones, payment rules, and the details customers will see.
Step 3: Check time zones, payments, and customer-facing details
Set the business time zone and confirm how customers see appointment times
Set the same business time zone in your booking system, each staff profile, and the connected calendar. Then run a test booking to make sure the event lands at the right local time. After your internal setup matches, check the booking page and confirm what customers actually see.
Show booking times in the visitor's local time zone, or clearly label the booking time zone if that's what you prefer. At the same time, keep the internal calendar tied to your business time zone.
Use a DST-aware label like America/New_York so the clock shifts happen automatically when daylight saving time starts or ends. Once your time zone setup is locked in, move to payments. That way, unpaid slots don't sit there blocking your calendar for no reason.
Make sure paid bookings block time correctly
Don't block the calendar before payment clears. The flow should be simple: the customer picks a time, enters their details, finishes payment, and then the system saves the appointment to the calendar. If payment fails or the customer drops off during checkout, the slot should open back up right away.
In Gatsboy, Online Bookings and Stripe Payments sync confirmed reservations to the dashboard and connected calendar.
After that, test each service on its own. Say you offer a $75.00 haircut that takes 60 minutes and needs a 10-minute cleanup buffer. That booking should block 1 hour 10 minutes on the staff calendar, not just 60 minutes.
Run a test transaction and check a few things:
The start time is right
The end time is right
The booking is assigned to the right staff member
No overlap appears on the calendar
Then clean up the event fields and confirmation text so staff and customers are looking at the same booking details.
Include the right details in calendar events and confirmation messages
Put the customer name and service in the event title. In the description, include the duration, location or meeting link, staff member, price, and payment status - for example, paid, deposit only, or due on arrival. Use the same details in the confirmation message so nothing gets lost between systems.
Keep sensitive notes out of the calendar. For private consultations, store personal details inside your booking system or CRM instead, and use a reference ID in the calendar event. That gives staff clean calendar entries while customers still get the right booking information.
Pre-launch checklist: What to verify before turning on online bookings
Pre-launch checklist for small U.S. businesses
Before you turn online bookings on, check these eight items. Each one can make the difference between a smooth first booking and a frustrating day-one mess.
Item | What to confirm |
|---|---|
Calendar account | Connected to a business-owned account, not a personal one |
Destination calendar | A dedicated bookings calendar is selected |
Staff mapping | Each staff member is assigned their own calendar with individual working hours |
Working hours & buffers | Hours match your actual schedule; buffers are added before and after each service |
Service durations & pricing | Durations match the service length; prices display in USD |
Cancellation rules | Policy is set (e.g., 24-hour cancellation window) and visible during booking |
Time zone | Set to your U.S. time zone; customer-facing times display in 12-hour format |
Test bookings | At least one end-to-end test completed, including payment, confirmation, and calendar event |
Then run three launch tests:
A last-minute booking
A cancellation after the cutoff
A reschedule request
Once those checks are done, review the same settings again inside your business dashboard.
What to review inside Gatsboy before going live

If your booking system runs inside Gatsboy, use the dashboard for one last check before you publish.
Start in the Online Bookings module. Make sure every service record matches the booking page your customers will see. Even small mismatches here can cause confusion fast.
Next, open Stripe Payments and confirm that live mode is active. Also check that one test payment has already gone through correctly. That step helps you catch payment issues before a customer does.
Last, review the Google Reviews module. Make sure review requests go out after each completed appointment and that the message sounds like your brand. For most services, sending the request a few hours after the appointment tends to work well.
Key takeaways
Use this as your go/no-go check. Before launch, confirm the business account, staff mapping, time zone, payment flow, and one full test booking. Only go live after every item checks out.
FAQs
How often does calendar sync update?
Calendar syncing happens in real time. Once you connect your Google Calendar or Outlook account to your Gatsboy booking system, your availability updates right away.
That means fewer scheduling conflicts and fewer double bookings. When one calendar changes, Gatsboy keeps up.
What happens if a payment fails?
If a payment fails during online booking, the charge doesn’t go through, and the appointment stays unconfirmed.
In most cases, customers are asked to try the payment again or use a different payment method. Business owners should make sure their Stripe dashboard is set up correctly so they can get alerts and manage lead interactions in their Gatsboy dashboard.
How do I handle multiple staff calendars?
Use a system that supports individual calendar mapping and automated lead distribution. When each staff member connects their Google or Outlook calendar to the booking platform, availability stays up to date in real time and helps prevent double bookings.
Features like round-robin scheduling help spread work more evenly by assigning leads to the right team member without manual back-and-forth. Gatsboy also includes a centralized dashboard with lead and booking modules, which makes it easier to keep day-to-day work organized as your team grows.
Related Blog Posts
Join our community of 15,000+ business owners
Popular articles
Popular articles about your website and marketing your small business


