


How to Get a Professional Website in One Week
Website Tips
Want a professional website in just one week? Here's how you can do it without tech skills or a big budget.
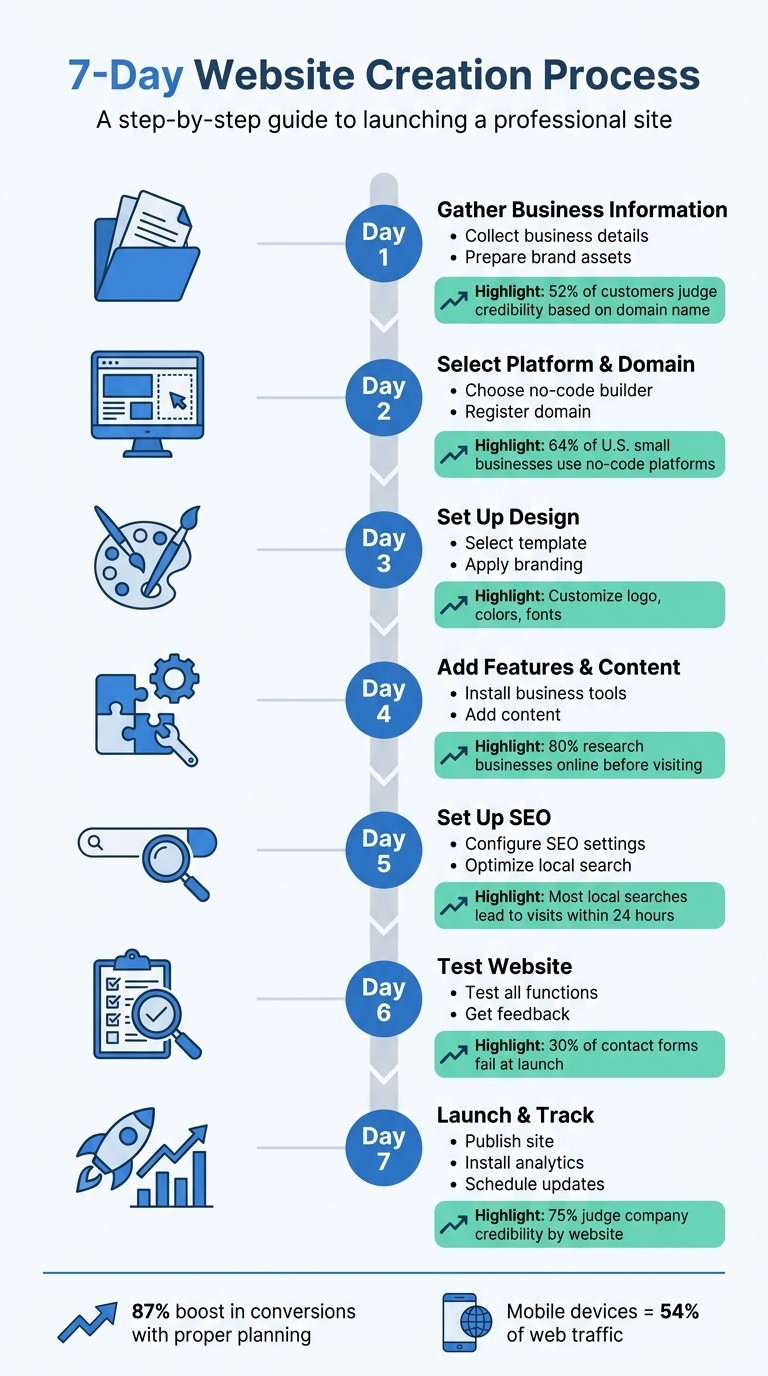
In seven days, you can create a polished website that builds trust and attracts customers. From gathering your business details to launching and optimizing your site, follow these steps:
Day 1: Collect your business info (name, contact details, branding assets) and prepare a clear business description.
Day 2: Choose a no-code website builder and register a domain name that aligns with your brand.
Day 3: Customize a template, apply your logo, colors, and fonts, and ensure a clean design.
Day 4: Add essential features like contact forms, booking tools, and payment options. Upload engaging content and visuals.
Day 5: Set up SEO and local search to ensure your site ranks and reaches the right audience.
Day 6: Test every feature, fix errors, and gather feedback to refine your site.
Day 7: Publish your site, set up analytics, use a website SEO checker, and plan regular updates to keep it running smoothly.
7-Day Website Launch Timeline: Step-by-Step Guide
How-to Create a Website and Rank in Google in Just 1 Week - Step 1 Essentials
If you're in a rush, you can even build a business website in under 2 hours using modern tools.
Day 1: Gather Your Business Information and Brand Assets
Before diving into a website builder, make sure you have all the essential details and branding materials ready. This step keeps your project on track and prevents unnecessary delays.
Collect Your Business Details
Start with the basics: your business name, address, phone number, email, and operating hours. If you’re planning to set up payment processing through platforms like Stripe, have your EIN or business registration details handy. Don’t forget your social media handles - keeping these consistent across platforms strengthens your online presence. Remember, 52% of customers judge a business's credibility based on its domain name, so getting these details right is crucial.
Craft a one-sentence description of your business that highlights what you do, who you serve, and why it matters. This will likely become your homepage headline. You’ll also want to outline key points for your main pages: Home, About, Services, and Contact. Anna Suntsov, Blog and Social Design Team Lead at Wix, advises:
"The most important thing before building a website is good research. Know what you want to do and collect good inspirations that will contribute to your design."
Once your business details are sorted, shift your focus to gathering your branding materials.
Prepare Your Brand Assets
For your logo, use a PNG with a transparent background or an SVG file to ensure it scales cleanly across different devices. Define your color palette by selecting 2–3 core colors and noting their hex codes. Choose 1–2 fonts that reflect your brand’s personality and maintain consistency across your site. These elements form the foundation of your visual identity, making your business instantly recognizable.
Gather 5–10 high-quality photos of your team, products, or workspace. Authentic images of your business resonate more with visitors than stock photos and help establish trust faster. Use your best photos to showcase your brand authentically.
Lastly, don’t overlook your privacy policy. If your site collects any user data - via contact forms, for example - you’re legally required to have one. Violating privacy laws like the CCPA can result in fines ranging from $2,500 to $7,500. Tools like Termly.io can help you create a privacy policy quickly and easily.
Day 2: Select a Platform and Register Your Domain
Now that you've got your business details and brand assets ready, it's time to lay the groundwork for your online presence. This means choosing the right platform for your website and securing a domain name. These two steps are critical, so take the time to make thoughtful decisions.
Choose a No-Code Website Builder
Start by thinking about what you want your website to do. Are you showcasing services, taking bookings, or selling products? For most small businesses, a no-code website builder is the way to go - 64% of U.S. small businesses use these platforms because they’re quicker, more affordable, and require no coding skills.
Look for platforms that come with the essential website elements you need right out of the gate. Must-haves include contact forms, booking tools, SEO options, and analytics dashboards. Since mobile devices drive 54% of U.S. web traffic, make sure the platform you pick automatically optimizes for mobile. Esin D. Habif, Product Marketing Lead at Wix.com, puts it perfectly:
"As a creator or entrepreneur, you're often wearing multiple hats... you need a website builder that makes it easy and very learnable for you to do all of those things."
When selecting a template, don’t overthink it - limit your browsing time to 30 minutes. Businesses that succeed online often launch a functional version quickly and refine it over time, instead of waiting for perfection. If you’d rather skip the setup altogether, companies like Gatsboy can create professional websites on platforms like Framer, complete with built-in tools for payments, bookings, and lead management.
Once you’ve chosen your platform, it’s time to claim your online address.
Register Your Domain Name
Your domain name is your online identity, so keep it short, simple, and aligned with your brand. A .com domain is ideal, and pairing it with a professional email (like hello@yourbusiness.com) adds credibility.
Think about future growth when choosing a domain. For instance, "annasdesserts.com" leaves room for expansion, while "annascupcakes.com" might limit your brand if you decide to offer more products. Typically, .com domains cost $10–$20 per year, though some providers offer discounts for the first year. Always check renewal rates before finalizing your purchase.
Many website builders include a free domain for the first year with their annual paid plans. This streamlines the process and avoids the hassle of manual DNS configuration. Once you’ve registered your domain, set it to auto-renew or consider registering it for multiple years to ensure uninterrupted ownership.
Day 3: Set Up Your Website Design
With your platform and domain ready, it's time to focus on designing your website. This step connects all the groundwork you've done so far with a polished, professional look that represents your brand. The goal here is to choose a template that fits your business and customize it to create a user-friendly, visually appealing site that works effortlessly on any device.
Select a Template
Start by exploring templates tailored to your business type. Most platforms offer templates categorized by industry. For example:
E-commerce templates: Highlight product displays.
Portfolio templates: Focus on showcasing images.
Blog templates: Prioritize clean, readable typography.
Pick a template that matches your business style and goals, as you'll be personalizing it further. If you're using Gatsboy, you'll find templates specifically designed for small businesses, simplifying your decision-making process.
Apply Your Branding
Now comes the fun part - making the template uniquely yours. Start by uploading your primary logo to the header and a monogram version as your favicon (the small icon in browser tabs). These details add a polished touch to your site.
Next, incorporate your brand colors, but keep it simple. Use a neutral base palette and choose one bold accent color for elements like buttons and links. For typography, stick to two typefaces maximum - one for headings and another for body text - to maintain a sleek, cohesive look.
Make sure to use plenty of white space to enhance readability and avoid a cluttered appearance. Before wrapping up, upload a social sharing image (1200×630 pixels) to ensure your site looks professional when shared on social media. Take this opportunity to set global styles for fonts, colors, and buttons to maintain consistency across all pages and devices.
Day 4: Add Features and Content
A great design alone won’t cut it - you need the right tools and content to keep customers engaged and coming back.
Install Business Tools
Once your design is ready, it’s time to add the features your business depends on. Start with the basics: a contact form so potential customers can easily reach you. If you handle payments, integrating Stripe ensures secure transactions. For service-based businesses, an appointment booking system is a must-have, allowing clients to schedule directly through your site. Don’t overlook the power of Google Reviews - these build trust instantly, especially since nearly 80% of people research a business online before stepping foot in the door.
Gatsboy’s smart modules simplify this process. Through your business dashboard, you can handle leads, bookings, and customer messages all in one place - no need to juggle multiple tools. If you’re collecting user data through forms, make sure to include a privacy policy to comply with legal regulations.
With these tools in place, the next step is crafting content that speaks to your audience.
Add Your Content
Now it’s time to upload your business details, service descriptions, and visuals. Use the business summary you created on Day 1 to guide your content.
Your homepage is your first impression, so it needs to hit three key points: explain what you do, establish credibility, and guide visitors to take action - all within seconds. Be specific with service names - terms like "Residential Landscaping" are much clearer than something vague. If possible, include pricing or at least a starting figure to build trust.
For visuals, keep your images compressed to under 250KB to ensure fast loading speeds. And don’t forget: every page should feature a strong call to action like "Book Now" or "Contact Us" to encourage visitors to take the next step.
Day 5: Set Up SEO and Local Search
With your content ready, it’s time to ensure potential customers can actually find you online. SEO connects your business with people actively searching for your services.
Configure SEO Settings
Start with the basics to clearly define your site’s purpose. Every page should have its own unique title tag (keep it under 60 characters) and a meta description (ideally under 160 characters). These elements ensure your message is clear and visible in search results. For example, a title like "Emergency Plumbing Services in Chicago | 24/7 Repairs" communicates your service instantly, while a concise meta description can highlight what makes you stand out.
Structure your content logically. Use a single H1 tag for the main title and organize sections with H2 and H3 subheadings. This helps search engines understand your page’s layout. For images, use descriptive filenames (e.g., kitchen-remodel.jpg) and include alt text to improve accessibility and make your images searchable.
Security is another priority. Use HTTPS to protect your site - Google favors secure websites. Lastly, create an XML sitemap and submit it through Google Search Console to help search engines find your pages faster.
"The difference between setting up SEO for a new website from day one versus retrofitting it later is months of lost traffic and compound growth." - Gatilab
Once your technical SEO is in place, shift your attention to local search optimization.
Optimize for Local Search
Local search is critical, especially for small businesses. Research shows most local searches lead to visits within 24 hours.
Start by claiming and verifying your Google Business Profile (GBP). This free tool can drive qualified local traffic. Complete all fields in your profile and upload high-quality, authentic photos that showcase your business.
Be strategic with your primary category - it directly affects your local ranking. For instance, a specific category like "Civil law attorney" is likely to perform better than a broad term like "Lawyer".
Consistency is key. Ensure your NAP (Name, Address, Phone) details are identical across your website, GBP, and online directories. Embedding a Google Map on your contact page is another way to reinforce your location with search engines.
Don’t underestimate the power of reviews. Actively request feedback from happy customers and respond to reviews within 48 hours. Why? Because 92% of consumers view a business owner’s response as a sign of excellent customer service. Regular review activity not only builds trust but also sends positive signals to Google about your business’s reliability and engagement.
Day 6: Test Your Website
Your website might look ready to go, but did you know that around 30% of small business contact forms fail at launch? They either don’t work properly or send submissions to the wrong email address. Testing is the best way to avoid these pitfalls and ensure your visitors enjoy a seamless experience.
Test All Functions
Start with the essentials: your contact forms. Double-check that submissions go to the correct email. Then, open an incognito browser window and test every form on your site. When you submit, you should see a success message right away and receive a confirmation email within five minutes.
Next, inspect all links, buttons, and menu items. Create a checklist to stay organized and catch any broken links or 404 errors. On mobile, make sure phone numbers are clickable (click-to-call) and that buttons are large enough - at least 44x44px.
For e-commerce sites, go through the entire checkout process. Add items to the cart, test payments, and confirm shipping and tax calculations work as expected. Try this on both desktop and mobile. Also, check your site on multiple browsers, like Chrome, Safari, and Firefox, to ensure compatibility. Finally, run a speed test using PageSpeed Insights. Your site should load in under three seconds, especially since mobile devices are projected to account for 73% of small business website traffic by 2026.
Once you’ve confirmed that all technical aspects are running smoothly, it’s time to focus on how users perceive your site.
Get Feedback and Make Changes
Ask a colleague to glance at your homepage for five seconds, then explain what your business does. If they can’t describe it clearly, your value proposition might need tweaking.
Gather input from 5–10 people, ideally including potential customers. Avoid vague questions like “What do you think?” Instead, ask specific ones such as:
What confused you?
What information felt missing?
What did you like most?
These targeted questions can help you uncover usability issues you might have missed. Before wrapping up, do a final sweep for placeholder text like "Lorem Ipsum" and confirm your SSL certificate is active - your URL should start with https:// and show a padlock icon.
These last adjustments will set you up for a smooth launch on Day 7.
Day 7: Launch and Track Performance
You've done the hard work of testing and refining - now it's time to launch your website and start seeing how users interact with it. Today is all about getting your site live, setting up tracking tools, and planning for ongoing improvements.
Publish Your Website
Once you're confident everything has been tested (thanks to Day 6), it's time to hit that Publish button. Double-check that your site loads properly across different browsers and devices. Also, confirm your URL starts with https:// and displays the padlock icon, signaling a secure connection.
Next, submit your sitemap to Google Search Console. This step alerts search engines to your site and speeds up the indexing process, helping your pages appear in search results faster. If you're using WordPress or similar platforms, make sure the "Discourage search engines from indexing this site" option is turned off - otherwise, your site won't show up in searches.
Install Analytics
Set up Google Analytics 4 (GA4) immediately after launching your site so you can begin tracking visitor activity from day one. GA4 provides insights into traffic sources, popular pages, and how long users stay on your site. It also tracks key actions like purchases or form submissions, giving you a clear picture of what’s working.
Pair GA4 with Google Search Console to monitor your site's rankings and pinpoint any SEO issues. If you're focusing on specific goals - like newsletter sign-ups or "Contact Us" clicks - be sure to configure these as Goals in GA4. For those using Gatsboy, its built-in analytics can give you additional insights into how users interact with features like bookings or lead collection modules. With these tools in place, you'll have a strong foundation to measure and improve your site's performance.
Schedule Regular Updates
"A website is never really finished – it grows with the company." - Chantalle Alberstadt, Brand Designer
To keep your site up-to-date and relevant, plan for regular maintenance. Schedule weekly checks to review analytics data and make necessary adjustments every two weeks. Updating content, such as blog posts or customer reviews, helps maintain credibility and keeps your site fresh.
Frequent updates are essential for staying aligned with your business goals and building trust with visitors. Remember, 75% of users judge a company's credibility based on their website. Keeping your site dynamic and reliable ensures it reflects the quality of your brand.
Wrapping Up
Over the past week, you've followed a clear, step-by-step plan to take your idea from preparation to a fully launched website. This seven-day roadmap has shown that even small business owners without technical skills can create a professional online presence. Thanks to Gatsboy's platform, technical details like SSL certificates, mobile responsiveness, and secure HTTPS are handled for you, making the process much smoother.
By sticking to this structured approach, you've ensured your website is not just visually appealing but also functional and effective. With features like Stripe payment integration, lead capture forms, and SEO optimization, your site is built to engage customers and drive results. In fact, these elements can lead to an 87% boost in conversions, proving that thoughtful planning pays off.
"A website without a clear commercial strategy is a digital brochure. It might look professional, but it won't generate leads." - Inzimam Ul Haq, Founder, Codivox
Your website is more than just a launch - it’s a living, evolving tool for your business. The maintenance schedule you set up on Day 7, which includes weekly analytics reviews, bi-weekly content updates, and monthly technical checks, ensures your site remains secure and relevant. Research shows that 44% of visitors leave websites lacking visible contact information, highlighting the importance of keeping your site updated and trustworthy.
While the launch is complete, this is just the beginning. With consistent upkeep and improvements, your website can continue to grow and deliver value for your business. Stay committed to your maintenance plan, and your site will remain a powerful asset for years to come.
FAQs
What pages do I need on day one?
When building your website, day one should be all about creating the key pages that define its purpose and give visitors the information they need. Here's where to begin:
Homepage: This is your website's first impression. Clearly explain what your business does, who it's for, and what actions you want visitors to take.
Contact Page: Make it easy for people to reach you. Include your contact details or a simple form for inquiries.
Services or Products Page: Highlight what you offer. Whether it's products or services, provide a clear and concise overview.
These pages are the foundation of your site, helping visitors quickly grasp what your business is all about.
What should I buy first: a domain or hosting?
When starting a website, it's smart to purchase your domain first. This guarantees you lock in the exact web address you want, especially if the name is in high demand. After securing your domain, choose a hosting provider that works seamlessly with your platform and integrates smoothly with your domain. This method streamlines the setup process and helps establish a cohesive, professional online presence right from the beginning.
What should I track in GA4 after launch?
After your website goes live, it's crucial to monitor key user interactions in GA4. This helps you gain insights into visitor behavior and make informed improvements. Pay attention to these areas:
Page views: Spot which pages are getting the most attention and understand how users navigate your site.
Engagement metrics: Look at details like session duration and bounce rate to gauge how users interact with your content.
Events: Track specific actions, such as form submissions or e-commerce activities, to see what users are doing.
Conversions: Measure success by monitoring goals like sign-ups or purchases.
Traffic sources: Identify where your visitors are coming from, whether it's search engines, social media, or other channels.
By focusing on these metrics, you can better understand your audience and refine your website to meet their needs.
Related Blog Posts
Únete a nuestra comunidad de 15,000+ propietarios de negocios
Artículos populares
Artículos populares sobre su sitio web y la comercialización de su pequeña empresa


